Soil sampling and interpretation questions: OM246 & MLSN
These questions came by email.
After watching the ATC Office Hours autumn 2022 OM246 review (and other ATC content) I had a few questions. I have researched and studied two specific items but couldn’t find the exact answer to what I was looking for. …
Here’s the details I’d like cleared up with how you go about your sampling.
These were excellent, detailed questions, and I’ll answer them here, one by one.
The first set of questions are related to the OM246 method for measuring total organic material by depth in the soil.
1. Where do you start the “0cm” mark, on the sample profile? I thought I saw in the ATC Office Hours that you align the sample at zero, just under the thatch? Or “verdure”, rather? When I pulled and sliced my samples in the fall of 2021, I was using the base of the leaf tissue/top of the sample as my “0cm” on the ruler.
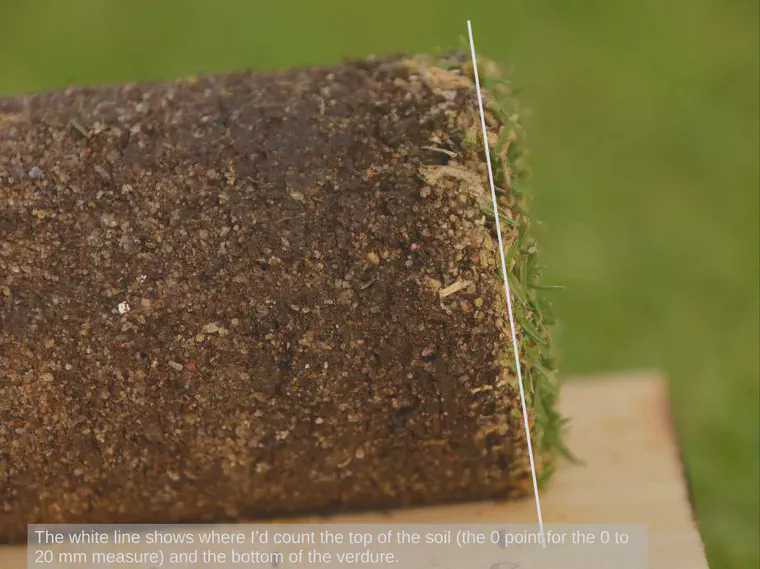
That’s correct, I use the top of the soil as the 0 cm mark. The top of the soil is the same as the bottom of the verdure—the bottom of the aboveground plant material. I annotated some images in 2019 as part of a research project, to show where I consider this point to be and what I use as the 0 cm mark, when I collect samples.
Here are a couple examples.

2. Do you use a standard measurement to find the zero/starting point on all samples? (greens and fairways). In other words, if my “0cm” point in my greens sample is “5mm” below the surface of the green (assuming I wasn’t doing my samples correctly in question 1), then would this same measurement be carried over to a fairway sample? Or is the fairway sample starting point different because it has a thicker verdure layer?
I try to keep the starting point the same, as I marked in the image file available for download above. It wouldn’t matter if the sample is from a green, a fairway, an approach, or a tee. The 0 cm point will always be at the base of the verdure and the top of the soil.
One thing I do recommend doing differently is related to verdure removal. By “verdure removal” I mean “cutting the grass off the sample.” I do not recommend verdure removal from putting green turf, because I consider it to be almost impossible to do consistently, and with modern putting green maintenance there is often sand intermingled with the verdure. Thus the very process of verdure removal disturbs the sample and what we are trying to measure.
On fairway height turf, and probably on tees, and perhaps on approach turf, we don’t have such a big problem with sand in the verdure and with difficulty in removing verdure. Plus, there is a thicker verdure layer in those higher-cut turf areas, as you have noted. Therefore, I recommend removing verdure whenever sampling turf that is not from putting greens, if possible. Removing verdure will not change the location of the 0 cm point.
3. What sampling tool do you use and how many subsamples per area? Currently, I do 5 subsamples with a profiler and cross section into my 2-4-6cm sections. I like the flat profile sample vs. round core samples but I suppose as long as my sampling is consistent, it probably doesn’t matter.
I agree with you. As long as the sampling is consistent, it probably doesn’t matter. I’ve used a variety of tools, including a flat profile sampler. My favorite tool for this sampling is a 4 cm diameter pipe that pulls a cylindrical sample.
- I find it easier to cut consistently at a depth when cutting a small diameter cylinder, rather than when using a larger flat soil profile.
- I take 5 subsamples from each area being tested.
- With the 4 cm diameter sampler, each 2 cm deep puck is about 25 cm3, so I am submitting about 125 cm3 total sample volume for burning.
- If one wants to fill the holes with plugs from the nursery, it is straightforward to cut clean plugs with this 4 cm diameter sampler. A 3 cm diameter sampler works well too.
- There are photos and additional details in the OM246 sampling instructions document on the OM246 project page.
The next set of questions are about sampling for soil nutrient analysis and about soil test interpretation using MLSN.
4. How deep do you usually go? I’ve always marked my probe at 4 inches (10 cm).
I recommend exactly that depth. For turfgrass, I recommend a sampling depth of 10 cm unless you’ve got a really good reason to sample at a different depth.
5. Leave the grass/verdure attached? I’ve done both ways and maybe haven’t standardized it.
I recommend leaving grass and verdure and thatch attached. I’ve also done it both ways. Twenty years ago I used to pinch off the little plug of grass and any thatch from the top of the sample. But I do not recommend doing that today. Why? Because the laboratory has standardized procedures and machines that remove this material automatically.
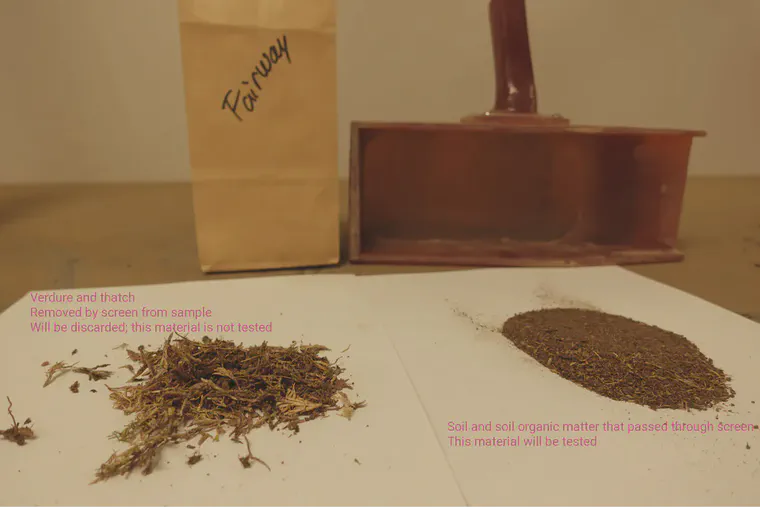
For consistency, I prefer letting the screens at the laboratory remove this material from the sample, rather than trying to do it myself. Sampling is faster this way too, but the main reason I do this is for consistency.
6. Dry the sample before sending? I’ve never dried them first.
I recommend drying soil samples immediately after removing them from the soil. Soil is alive and dynamic. When there is soil moisture, microbes are active, and ion exchange reactions still happen. To keep the soil as close to the condition it was when the sample was removed from the soil, I recommend drying the sample. The sample will be dried once it gets to the lab. Why allow biological activity and chemical reactions to continue for an undetermined duration of time between the time the sample is removed from the soil and when the sample drying process begins at the lab?
I’ve written about this in a blog post that shows how much mineralization can occur in just a few days when samples are not dried.
For anyone who has read this far, you may be interested in ATC’s soil testing newsletter. This newsletter is for ATC’s soil testing clients, but it contains information about sampling recommendations and the types of topics being discussed in this blog post.
7. Is it necessary to mix the sample to make if homogeneous before bagging or will the lab do that? (assuming I’ve used the multiple subsample method)
The short answer to this is yes, you must mix the sample, if you are taking subsamples and then from those subsamples selecting for yourself a representative composite sample to send to the lab.
But I guess a lot of people don’t follow composite sampling instructions to the letter. The assumption with composite sampling is that you take a lot of subsamples, generally the minimum number is 12, and you place those all in a clean bucket or other container, mix them together, and then select a composite sample from this mixed material that is sufficient volume for testing at the lab. It seems to me that in the turf industry, a lot of people take subsamples and then send all of them to the lab. If that is how you do it, then there is no need to mix, because the lab does this when the samples are ground and screened.
To read more about the standard procedure, I recommend studying the documents I’ve linked to in the series I wrote about composite sampling.
8. I recently heard Micah’s preference for simply taking 1 cup cutter size sample vs. subsamples. In this scenario … how would you answer questions 1-4?
That’s a slight misunderstanding about my preference. I don’t recommend a cup cutter size sample. A cup cutter would collect way too much soil. I currently suggest to ATC clients that they submit a single core sample, if they are comfortable with this type of testing. I use a 3 cm diameter core sampler for soil nutrient samples. The single core sample needs to be sufficient in volume to meet the laboratory’s minimum sample requirement. I’ve written about single core sampling, if you’d like to learn more about the reasons I prefer this method.
A 3 cm diameter core to a depth of 10 cm is 70 cm3 of material. This is ample material for most of the standard soil nutrient analysis packages one might have run at Brookside Labs. Check with the lab you are sending samples to to find their minimum sample requirement.
9. Does Brookside Labs have an MLSN report template that they use to send your results? I’ve been receiving the BCSR % still on mine.
No, they don’t have an MLSN report template. To make the calculation for nutrient requirements using MLSN, one needs to know the expected nutrient use. To get the expected nutrient use, one needs to know the grass type, how the grass is going to be managed, and the duration of time for which the nutrient requirement is being calculated. Because of this, I don’t think a generic MLSN report template from the lab would be useful.
For more about why a generic MLSN report template wouldn’t be accurate, I recommend this article on the one thing I wish everyone would understand about MLSN.